This post is part of a series of developer logs for the game project Dunes & Dusk.
In the summer of 2023 I worked on a solo "art jam" I called Experiments With Pixelization. I learned a great deal on the topic of converting existing 2d images into pixel art and the myriad related topics. This post, then, can be considered a spiritual successor of a sort, as I've refined and applied what I learned then into a workflow for my current game project. While the links above are not required reading, they do provide some context on both the game itself and the process I'll describe further.
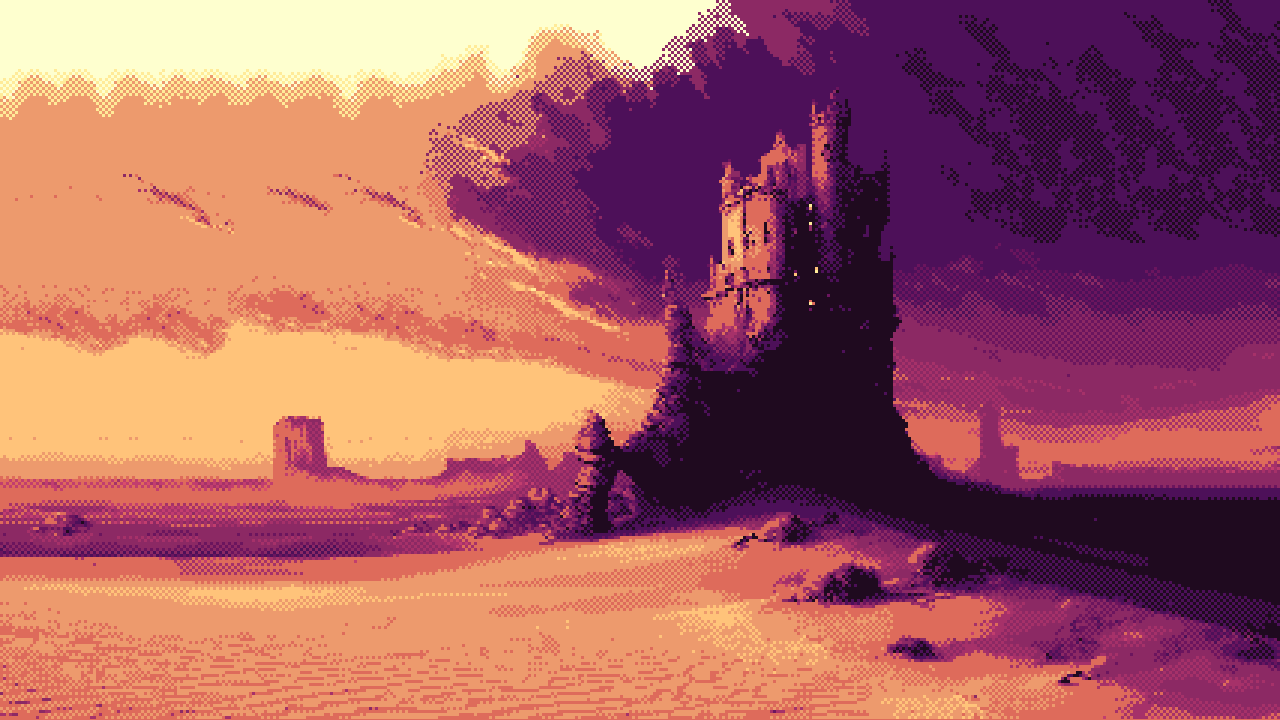
Here are three screenshots, taken at the time of this dev log, that provide a frame of reference for the rest of this article: the title screen, the first room, and an example of NPC dialogue in Dunes & Dusk. Most of the art featured in these screenshots (the border statues, scene background, npc portrait, etc) all started out as AI-generated art downloaded from the internet before being run through the pipeline. I'll walk through each step, and the tools used, to arrive at the output you see here.
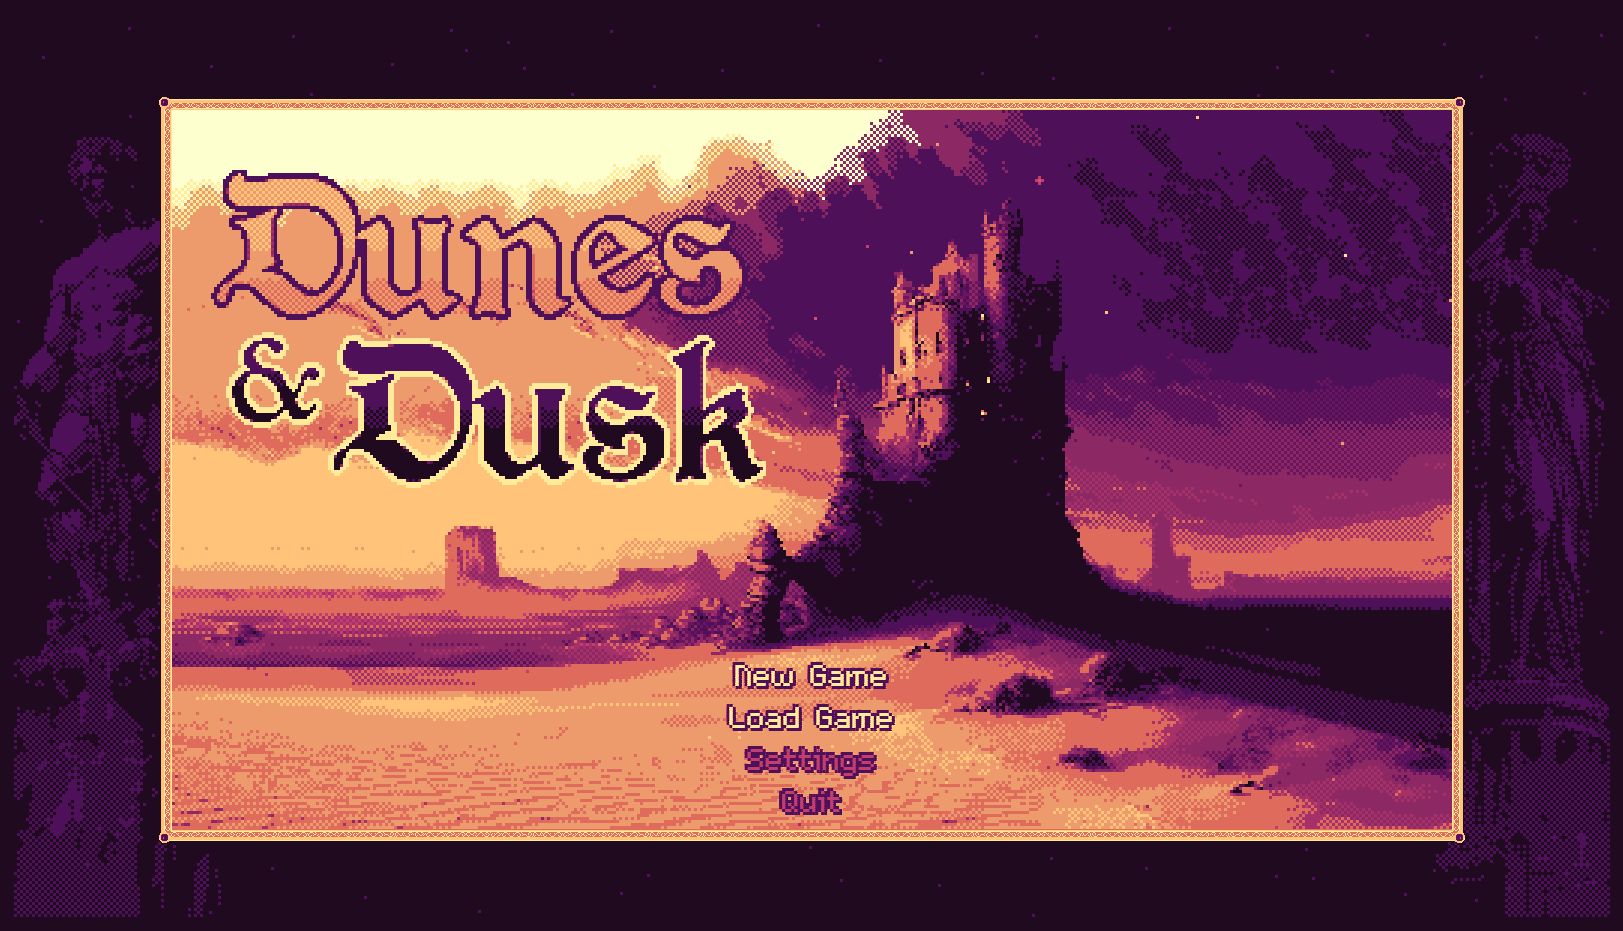 The game's intro screen.
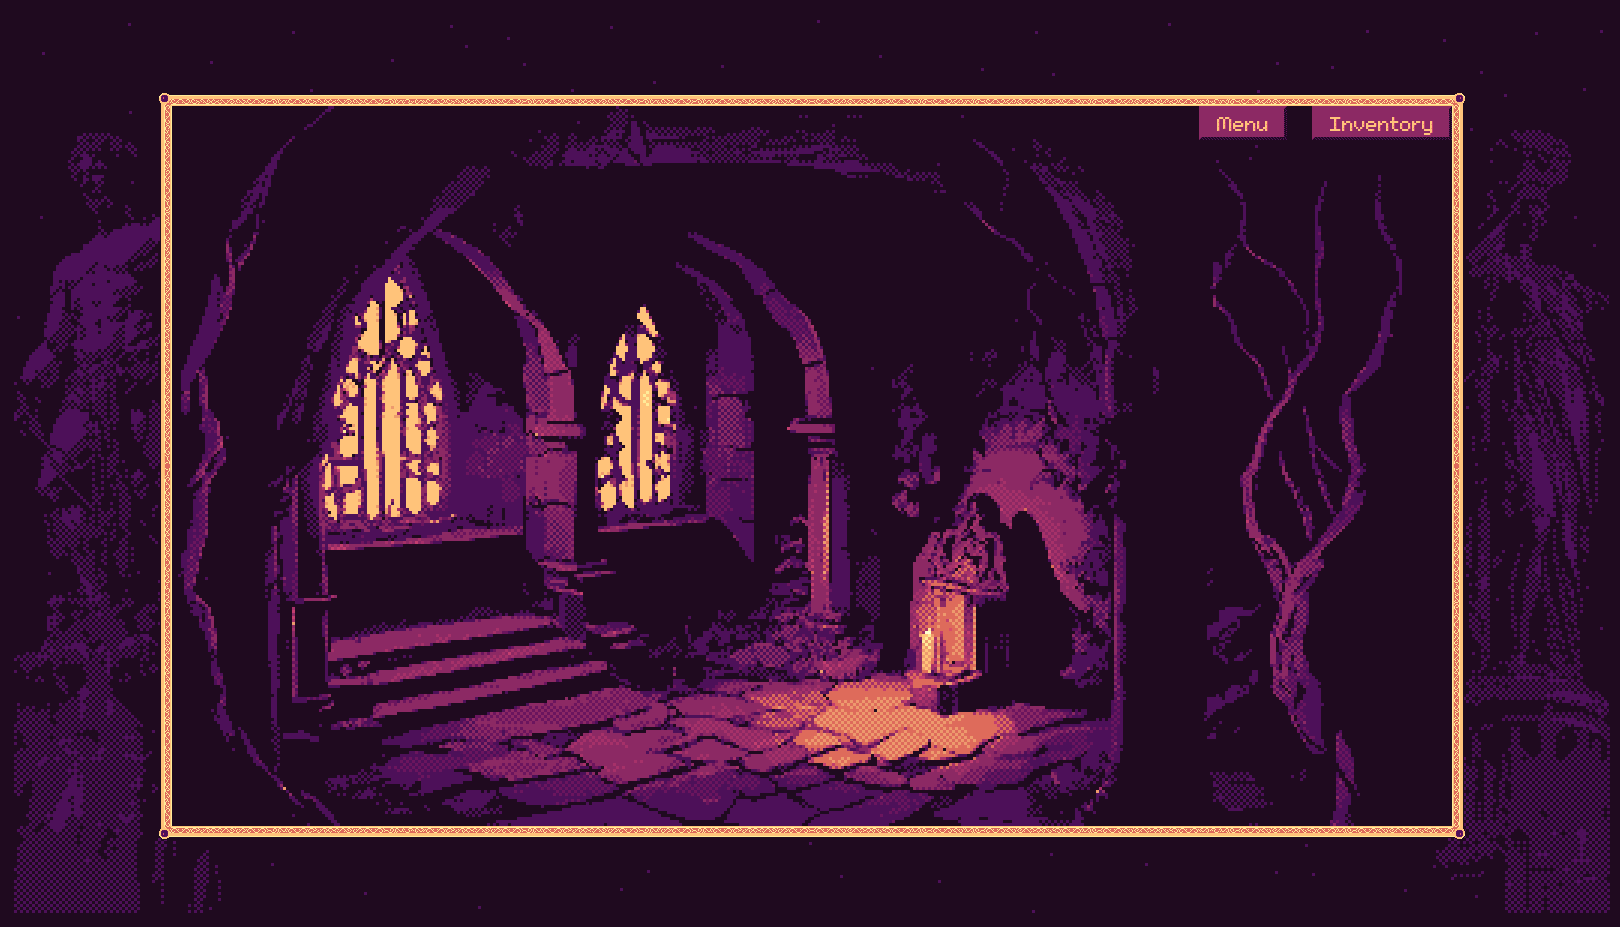 First room/scene in the game: the Shrine.
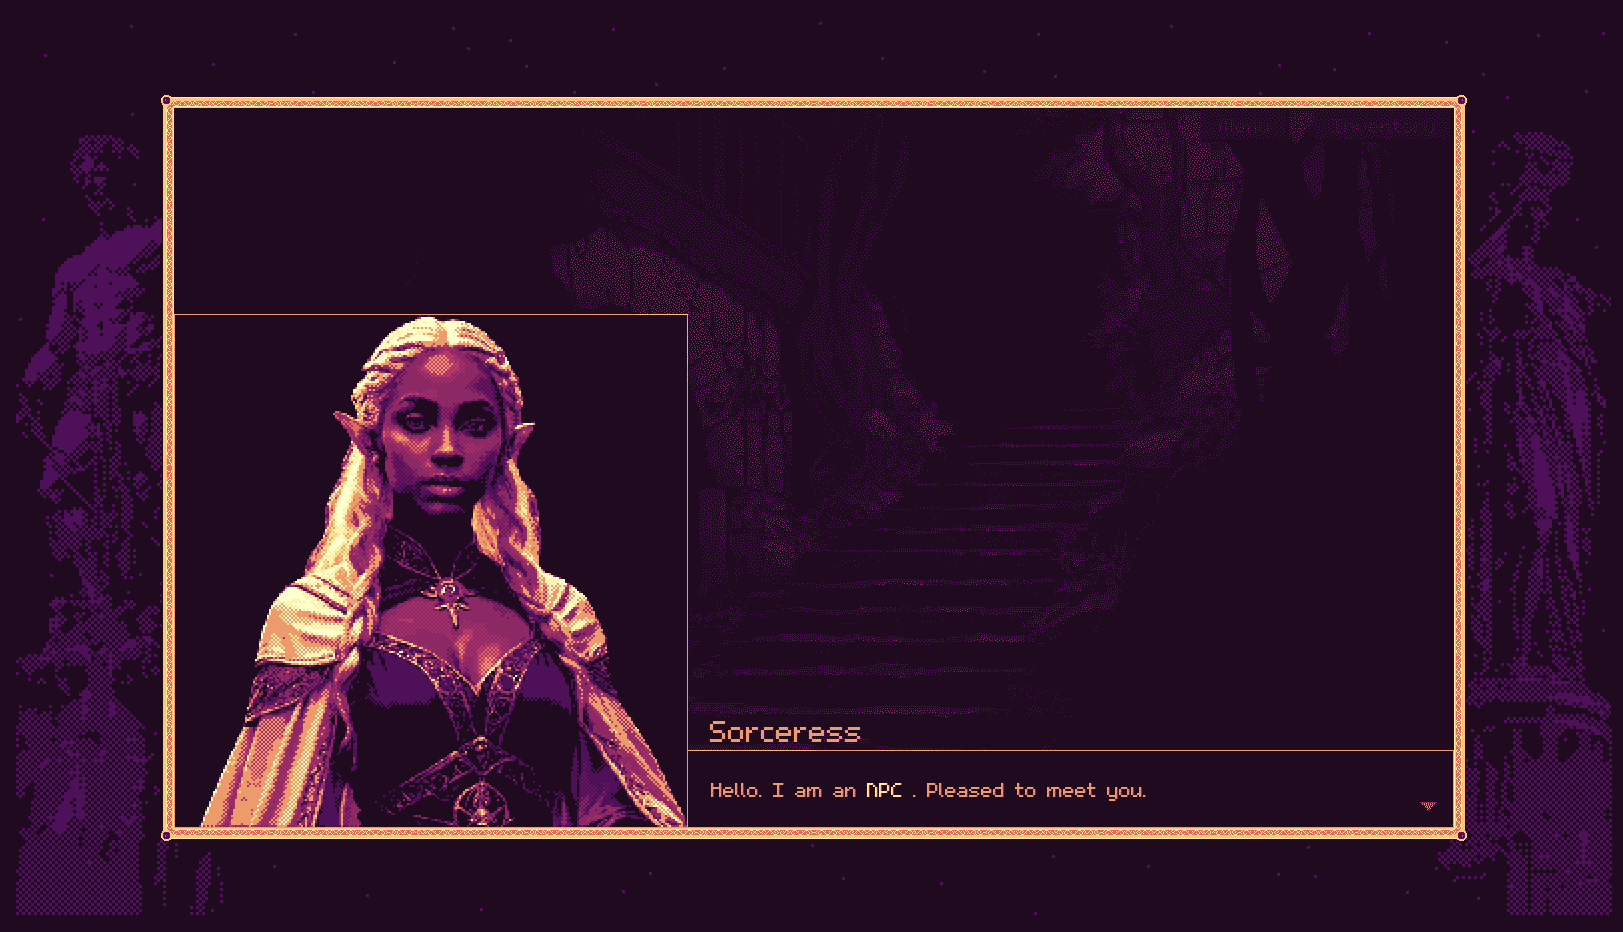 Screenshot showing off NPC dialogue.
My workflow consists of using three different tools for different purposes: Photoshop, PixaTool, and Aseprite. There is a lot of overlapping functionality between these three, and what I've landed on for workflow really boils down to personal preference. There are also some pros/cons of each, and limitations, that have guided me to this point. Aseprite, for example, has a lovely dithering gradient tool that isn't easily done in Photoshop.
My primary tool, however, is Photoshop - the sheer versatility of it meant I was often chafing trying to do something in the other tools and kept coming back to old reliable. I will say, however, that for creating pixel art from scratch Aseprite is the dedicated tool of choice. I use PixaTool for applying color palettes and doing the actual downsampling. I use Aseprite for some clean up, but mostly for animating.
Early on I chose a resolution of 1280x720 as my game's viewport dimensions. The 16:9 aspect ratio is common, and at this size I could display enough information while still getting a "retro" feel. Pixel art at this resolution didn't give me the retro vibe I wanted, though, so my next step was establishing what resolution I wanted the art to be.
Eventually I landed on ~426x240 as the intended pixel resolution for the artwork in the game. Each piece is upscaled to 1280x720 when rendered. This means any given "pixel" in the 1280x720 piece is a grouping of nine individual pixels in the artwork. I arrived at these numbers by running images through PixaTool at various stages of downsampling, and three steps just felt right. This decision sets an important baseline for the rest of the decisions in the workflow, and was the cause of many headaches as I worked through problems and a lack of understanding.
I've divided the pipeline up into parts based on moving from one tool to another.
An important consideration when looking for the source images is their original resolution. Ideally the asset has an initial resolution larger than 1280x720 (in the case of scenes), but as the downsampling process is destructive anyway, there is some wiggle room. If the source image is smaller than 1280x720 I can upscale it to 1280x720 first using Photoshop. If it isn't too far from the goal resolution, it will be fine.
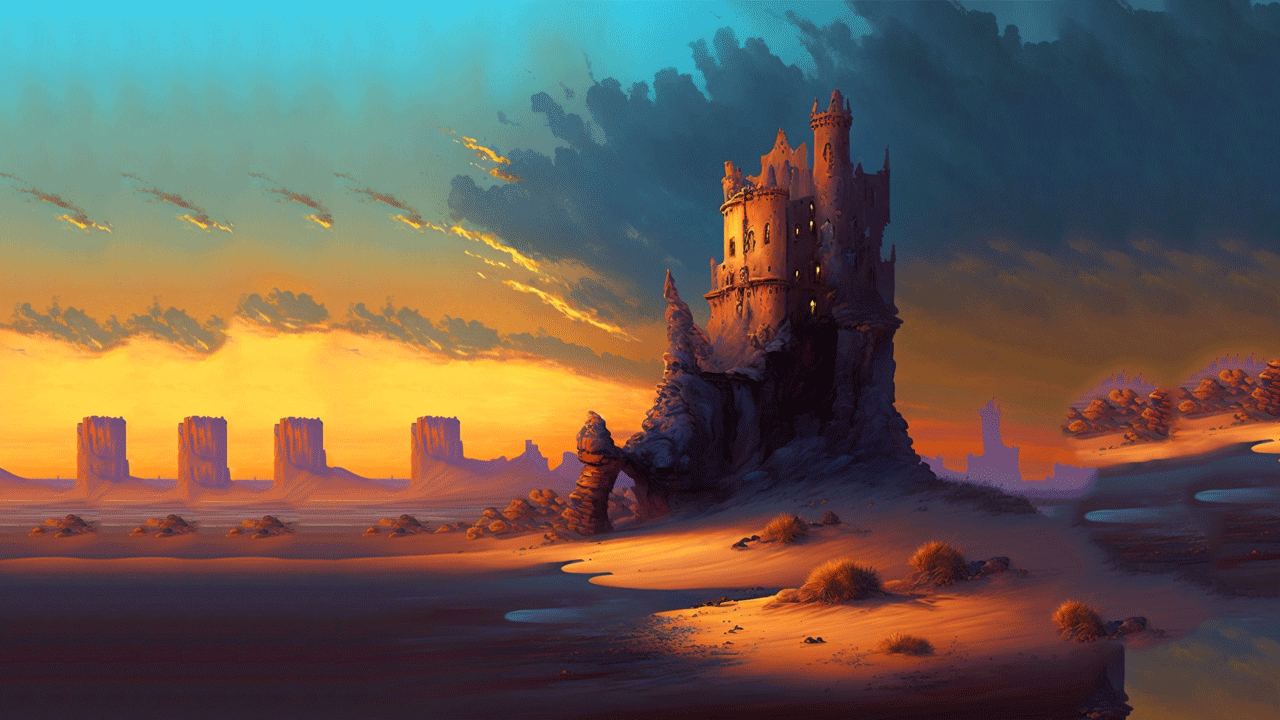
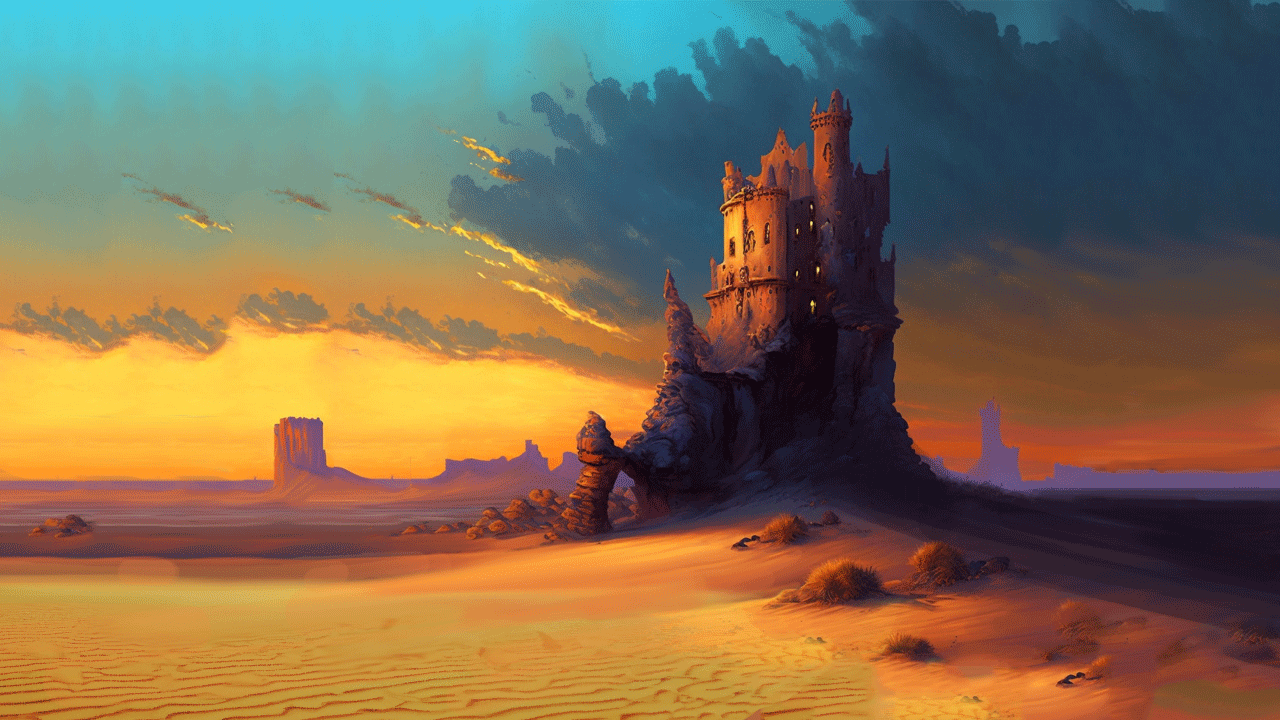
When working with AI-generated art there are usually flaws that need to be corrected. Flaws can also be born out of extending a source image that isn't close to the target resolution (using features like Content-Aware Fill in Photoshop). To illustrate this step, here is the source image originally used to make the intro background asset. This step is labor-intensive, especially with a suboptimal image like this one. I extended it into the correct aspect ratio first, and then photobashed some foreground desert texture from stock photos. Lastly I did actual paint-overs using brush tools.
The goal of this step isn't to create something perfect or beautiful, but to fix glaring errors and prep the source image for the next step. At this point the asset will be 1280x720 and imported into PixaTool.
 AI-generated art at a suboptimal starting aspect ratio.
 Extending the original art into the correct aspect ratio.
 Photobashing textures and brush work clean up.
PixaTool handles converting the image into an indexed color mode with a defined palette, the actual downsampling, dithering, and various color corrections.
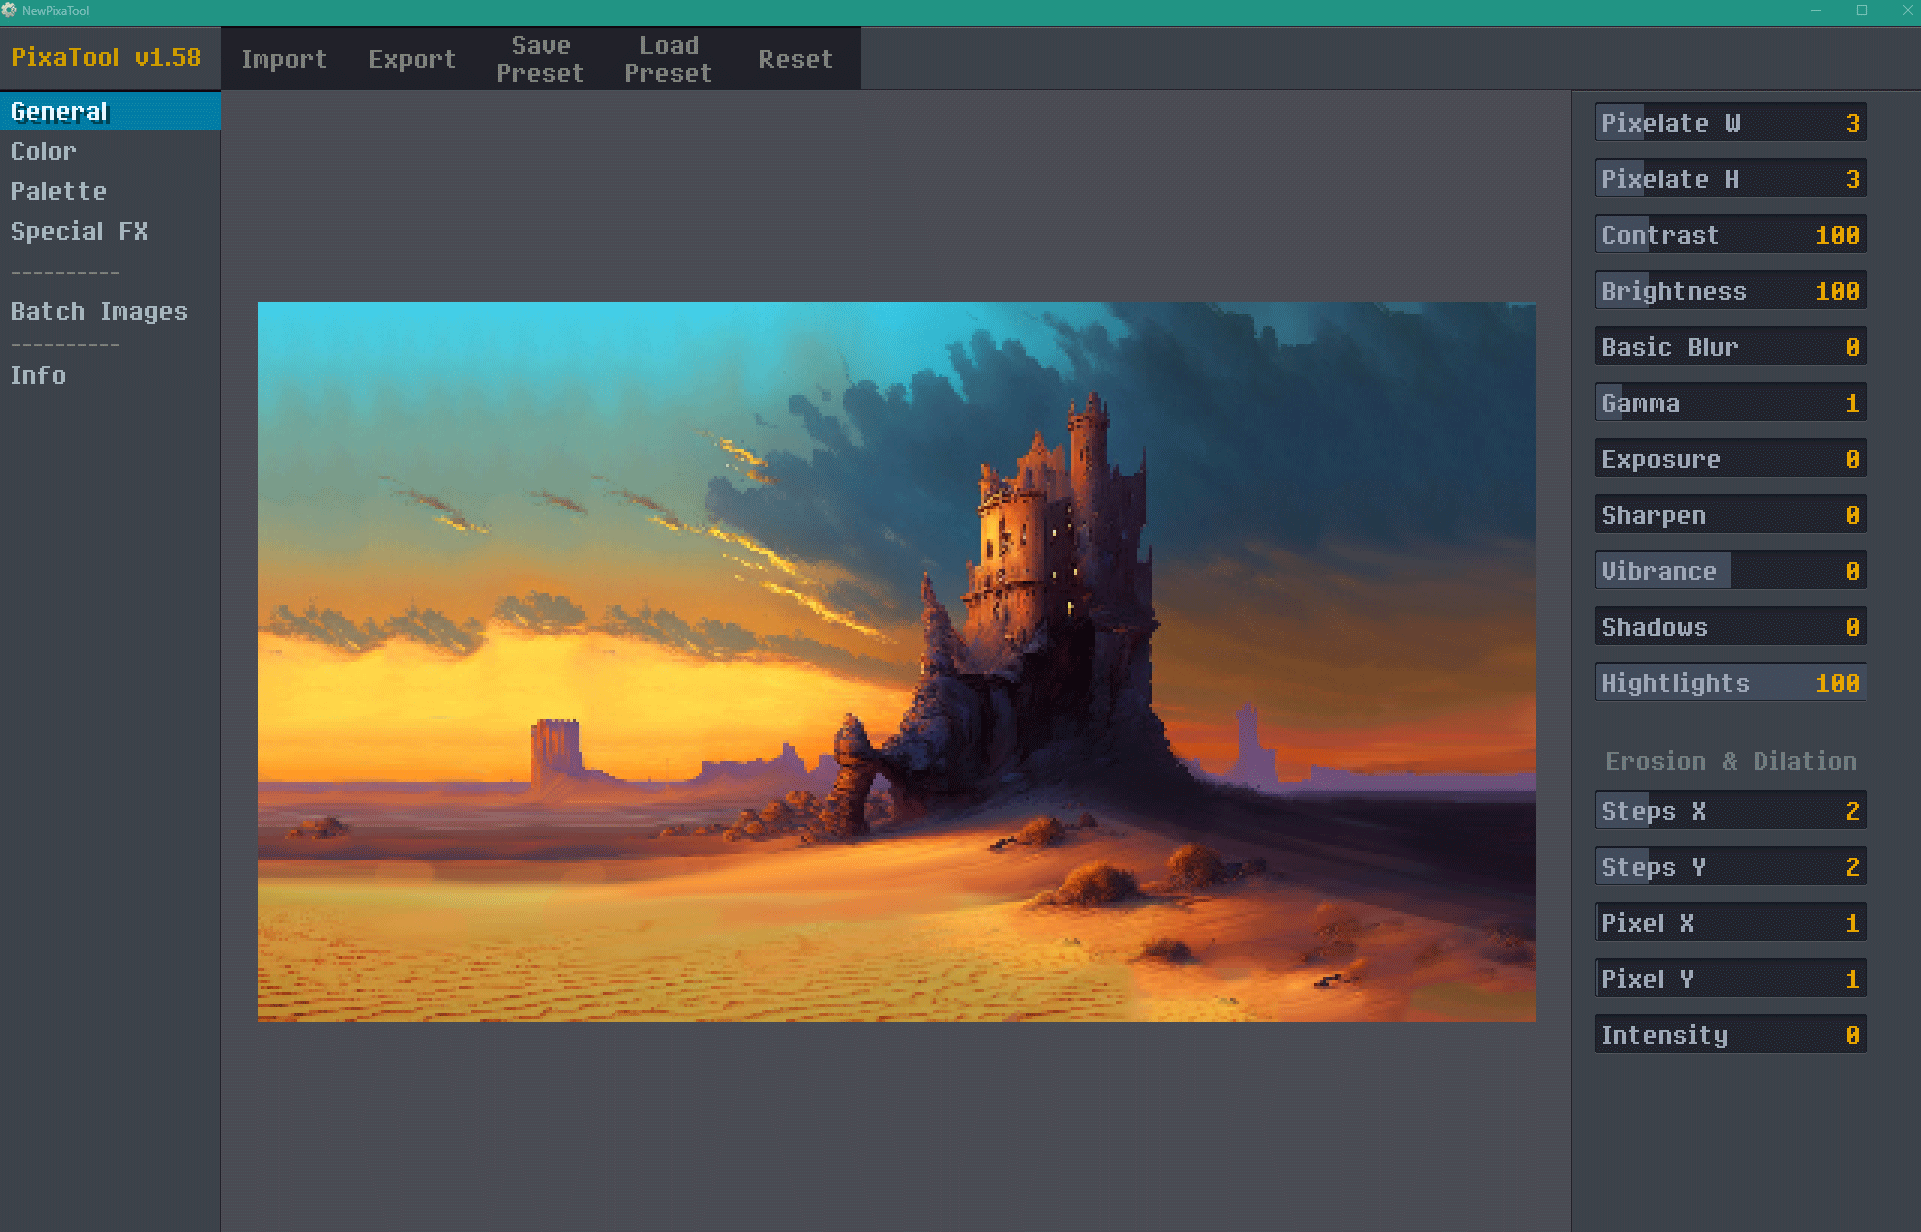 Screenshot of the PixaTool UI.
Limited color palettes can help unify the look of unrelated source material. For Dunes & Dusk, as the name implies, I wanted something with golds and purples; I chose Sunfall-12. PixaTool allows you to import a color palette file and performs a conversion on the source image. While I'm unsure on the exact algorithms used by PixaTool, Photoshop can do this too with its Indexed Color Mode:
Indexed Color mode produces 8-bit image files with up to 256 colors. When converting to indexed color, Photoshop builds a color lookup table (CLUT), which stores and indexes the colors in the image. If a color in the original image does not appear in the table, the program chooses the closest one or uses dithering to simulate the color using available colors.
There are multiple reasons I chose to use PixaTool over Photoshop for the color mode conversion. There was one issue that PixaTool had, however: it always included black. As I didn't want true black in my images, I had to find a solution. My search led me to a five-year-old forum post where the developer of the software confirmed it was a constraint of the tool. With a little digging into the .pal file format I was able to figure out a "workaround" and necro a long-dead thread.
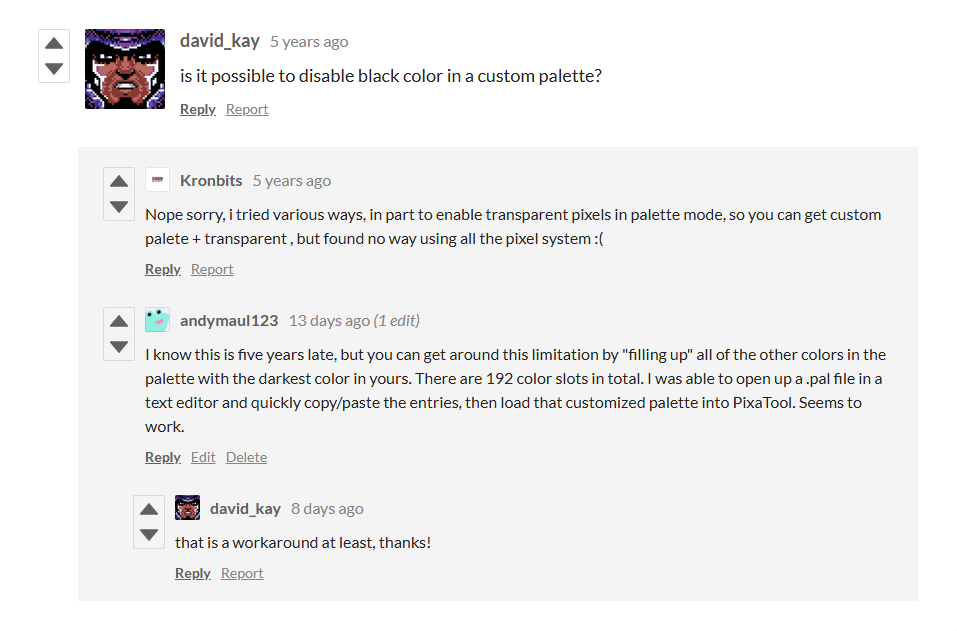 Necro-ing a long dead thread.
With the image indexed into the 12 colors of the sunfall palette, it's time to mess with sliders.
 The image indexed into 12 colors, but without any pixelation applied.
The core feature of PixaTool is its downsampling algorithms, which degrade the image in particular ways. As mentioned above, three "steps" gave me the look and feel I wanted in my games. The tool offers a handful of other sliders to play with as well. Some are basic photo-manipulation settings like Brightness, while others are specific to the pixelation downsampling algorithms.
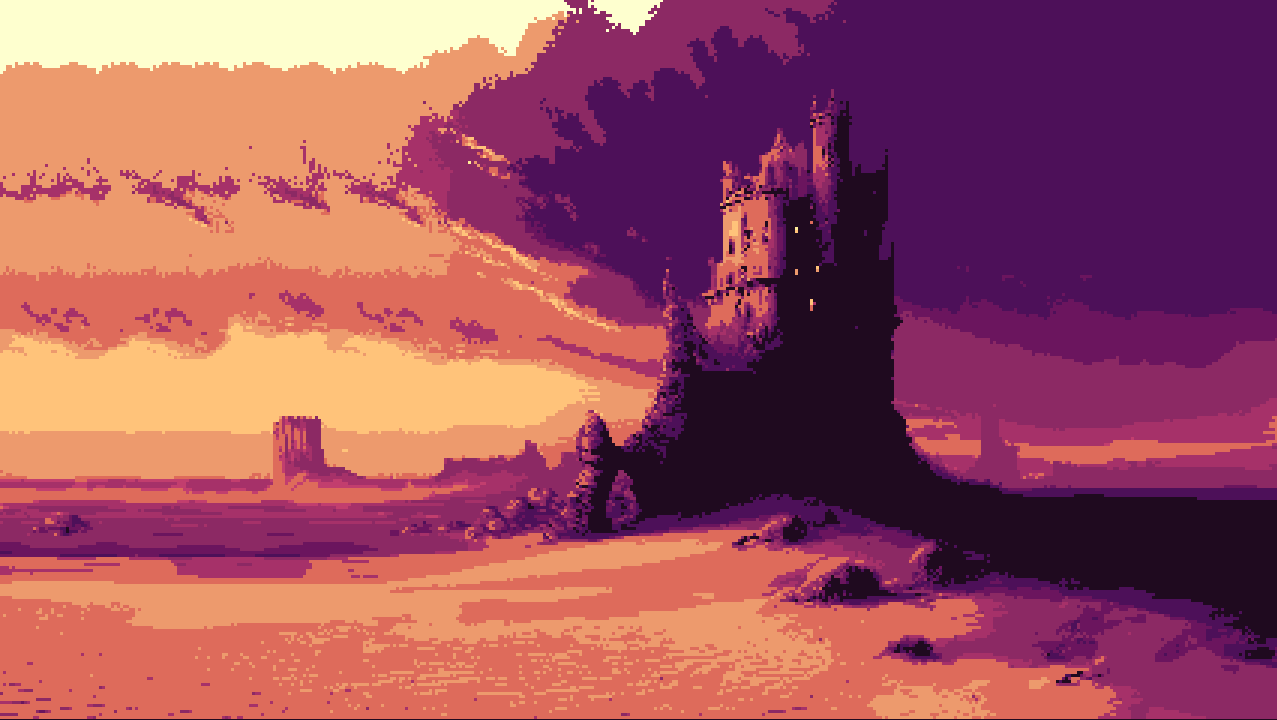 The image with three steps of pixelation applied.
One of the unique sliders PixaTool offers is Dithering. Dithering is an application of structured noise to an image with the goal of simulating color depth and texture without using additional colors. It's the shading of pixel art, and is an art in of itself. Aseprite offers dithering features as well, but attempting to get this type of look in Photoshop is much more difficult. At this stage I'll play with the various sliders to dial in the dithering amount I want, and also perform any color corrections I need to. The result is an asset that is almost done.
 An almost finished asset.
Knowing that the images will be rendered at 1280x720 there are two options available: scale the asset now or rely on transforms at the time of rendering. CSS has the ability to do this via the image-rendering property. The downside to choosing three steps of pixelation at 1280x720 is it doesn't divide cleanly. If I relied on CSS to handle upscaling there would be some distortion that could lead to issues down the road.
I opted, instead, to bring the asset back into Photoshop once last time. Here I upscale it back to 1282x720 from 427x240 using nearest neighbor interpolation to retain the pixelated look. At this point the image is nearly done, but there are still some tiny issues to resolve. Blowing up the image and aligning it to a nine-pixel grid simulates the original 427x240 resolution. Here you can see there are some "half-pixels" due to the unclean division. I could leave the image like this, but if I want to incorporate elements over this and have them fully aligned to the pixel grid there will be problems. Best to clean it up now.
 Misaligned and halved pixels are revealed when blown up against a grid ruler.
If the asset is static then the journey ends in the previous step. Some assets, though, need to be animated. In keeping with the retro theme of this project, I'm using .gif as the file format for animations. Aseprite is a software dedicated for working with pixel art, and has a simple keyframes system. This is often the longest step, as I am not an animator, but once I've created a basic 8- or 12-frame animation I can export it as an animated gif (with or without looping, depending on the nature of the asset).
The process outlined here is the culmination of many hours of research and trial-and-error that I've only recently settled on. I'm happy with the results, and consistency, of this workflow for Dunes & Dusk. This process isn't a replacement for handcrafted pixel art; if this project were intended to be a commercial endeavor the time spent here would be better off in developing my skills as a pixel artist. Or, more realistically, I'd hire someone to make art for the game. As a solo dev making a pet project, though, this process gives me the flexibility to create assets much faster in the long run.
If you've made it this far, thanks for reading! In future dev logs I'll go into detail how these assets are used to provide various effects in the game.